No one can deny the fact that WordPress is an essential part of the web developing field. WordPress provides unlimited freedom to control content on a website with dynamic visual to make the front end of the website appealing to make visitors stay longer on the website.
WordPress comes with a handy and easy to understand CMS system which makes WP unique from other CMS platforms. Administrators have the freedom to upload content to share with their visitors through their blogs or web pages. There are so many hosting providers in the market who are giving one click installation on their hosting servers.
WordPress on iPage
iPage is one of the top web hosting providers with WP installations in their dashboard. Every product has goods and bads. If we talk about the bad ones of WP installation on hosting servers we might face issue while uploading content in the media library. We are restricted to a certain file size to upload content, by default, upload file size limit is not very hight. If you concern the following screenshot you will notice maximum file size limit is restricted to 30MB only.
How to increase upload file size limit in WP
To increase the upload file size limit no one needs any exceptional set of skills in programming or coding, instead, a little knowledge of searching content through search bar is bit handy. To increase the maximum upload file size limit first of all one should have to be logged in their iPage hosting account.
After getting logged in, click on the icon saying ‘CGI and Scripted Language Support’. If you did not find this icon on your favorites you don’t need to panic, just scroll down and you will find it. CGI and Scripted Language Support will show you all the supported script languages like Perl scripting or PHP scripting. As WordPress is based on PHP scripts we need to make changings in PHP setting on the server.
On new page now click on PHP Scripting to make changes in PHP settings on the server. That will take us to setting page of the PHP.
Don’t click on any other of the services
post_max_size
Here you can make changes in PHP version on the server and some command changes as well. To change the file size limit click within the edit box saying ‘Edit your php.ini file for PHP 5.5’. Then press ‘CTRL+F’ on your keyboard and you will notice a search bar on your browser. As in screenshot, I am using Google Chrome so the search bar appears on the top right side of the screen. After appearing the search box, type ‘post_max_size’ and hit enter or return key. You will notice that some code is highlighted in the edit box of php.ini. Now change the 30M to a new value according to your requirements, in my case, I set it to 2048M. Just change the numeric value only nothing else.
upload_max_filesize
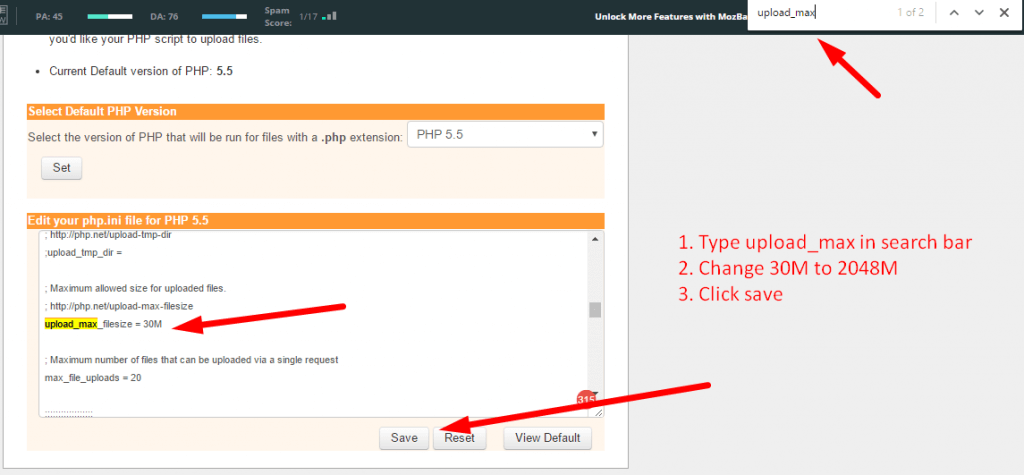
Now again, type in search box upload_max_filesize when code will be highlighted in the php.ini then change the numeric value to the same value entered in the previous search. In my case, I set the value to 2048m. After making changes press save to save the new changes. After making changes, go back to your WP admin panel and try to upload content in Media library.
Bingo, the maximum upload file size limit is updated to the new value set in php.ini. As in screen shot new file size limit is set to 2GB which is equal to 2048MB.
Note: Make changes only in numeric values and don’t do any change or click any other service on the hosting server dashboard.


